Secure Windows Scheduled Tasks with Managed Service Accounts

So I didn’t plan on writing about securely running scheduled tasks on Windows Server that require elevated permissions. However, after spending way too much time researching it, I think laying it out for others will be helpful. After reading this post, you will clearly understand how to securely create a Windows Scheduled Task that can run consistently with the right permissions.
Short on time? TLDR
Let me start with a rundown of what I needed to do.
I am building a PowerShell script to automate Windows Server Active Directory security functions. Some functions include Kerberos TGT password rotation, automatically disabling inactive users and computer cleanup. The functions will run daily from a PowerShell script that launches from a Scheduled Task, and both the PowerShell Script and scheduled task will live on the Active Directory Domain Controller. Some tasks require Domain Admin privileges, which is where the trouble starts.
Windows Scheduled Task Permissions Issues
Scheduled Tasks that require Domain Admin rights are tricky. If you create a scheduled task with a standard Domain Admin user account, everything will work as expected, but only if that same user account is logged on when the scheduled task runs. So this is not a reliable option. Running the scheduled task as the SYSTEM user will not work either. The SYSTEM user is helpful for many highly privileged jobs, but it still lacks permissions within the domain. Specifically in my case, the SYSTEM user lacks the right to rotate the Kerberos TGT user account password, among other things.
So what are the options to ensure my script has the permissions it needs when it runs? It should go without saying that hard-coding a Domain Admins password into the PowerShell script is out of the question; also, it’s dumb. The secure way of doing what I need is with a Standalone Managed Service Account.
Standalone Managed Service Accounts
Standalone Managed Service Accounts(sMSA) are Active Directory domain accounts that administrators use to secure one or more services that run on a server. Only a single server can use an sMSA account, securing it from misuse elsewhere within the domain.
sMSAs offer greater security than basic user accounts that act as service accounts. Here is a quick rundown of the benefits of sMSAs over a basic service user account.
- Set strong passwords
sMSA uses 240-byte, randomly generated complex passwords. The complexity and length of the password ensure brute forcing is unrealistic. - Cycle passwords regularly
Windows automatically changes the sMSA password every 30 days, by default. Our script or services don’t need to manage this process, and we will not need to update anything when the password change occurs. - Account Usage Restriction
We can restrict the usage of an sMSA account to a single computer. This reduces the ability to abuse the account, unlike unrestricted user accounts. - Cannot be used to interactively log into Windows
Interactive login is authentication to a computer through the usage of their local user account or domain account. This means that console or Remote Desktop logins are impossible with an sMSA.
In short, the sMSA will allow us to have a highly-privileged user account within Active Directory that can only be used by one AD-connected Computer. That one AD-connected Computer is the only one that can retrieve the sMSA account password and use its given permissions and rights.
Creating sMSA Accounts
Now that we know what the sMSA account is and the security features it adds, let’s create one. To create an sMSA we will need to use PowerShell. I know, it is very out of character for Microsoft not to have a GUI option… but I digress.
Create the sMSA
Open an administrative PowerShell session and run the following commands.
# Create a new sMSA account with PowerShell
New-ADServiceAccount -SamAccountName "NewSmsa" -Name "NewSmsa" `
  -Description "My new sMSA" -RestrictToSingleComputer -Server $(Get-ADDomainController) `
  -Enabled $true
Now the new sMSA account has been created. You can check this in the Active Directory manager tools under the “Managed Service Accounts” folder.
Assigning the sMSA Account to a Computer
Now we need to assign the sMSA account to the one computer we want to use it on. To do this, run the following commands.
# Create a object variable with the Computer/Server we intend to use the new sMSA account on.
$ServerIdentity = Get-ADComputer -identity "Server01"

# Create a object variable with the new sMSA we just created.
$MsaIdentity    = Get-ADServiceAccount -Filter "Name -eq 'NewSmsa'" -Properties *

# Assign the new sMSA account to the one Computer/Server we needed it on.
Add-ADComputerServiceAccount -Identity $ServerIdentity -ServiceAccount $MsaIdentity.sAMAccountName
If you want to confirm the sMSA was assigned to the Computer object we specified, you can do so with the below command.
Get-ADServiceAccount -Identity "NewSmsa" -Properties HostComputers,msDS-HostServiceAccountBLThe “HostComputers” and “msDS-HostServiceAccountBL” attribute on an AD-Service-Account define the computer(s) a sMSA or a gMSA account is assigned.
Installing the sMSA in a Computer
We have the sMSA account created and assigned the computer that will use it in Active Directory. We now need to tell the computer using the sMSA account that it can use the new sMSA. If you are not already on the system that will muse the sMSA, log on or “Enter-PSSession” to the computer. Then run the following command.
# Create a object variable with the new sMSA we just created.
$MsaIdentity = Get-ADServiceAccount -Filter "Name -eq 'NewSmsa'" -Properties *

# Installs an existing AD sMSA on the computer on which the cmdlet is run.
Install-ADServiceAccount -Identity $MsaIdentity.sAMAccountName

# Test that this computer can retrieve the sMSA account password from AD
Test-ADServiceAccount -Identity $MsaIdentity.sAMAccountName
That’s it! We have our sMSA done.
Give an sMSA Account “Log on as a service” Permission
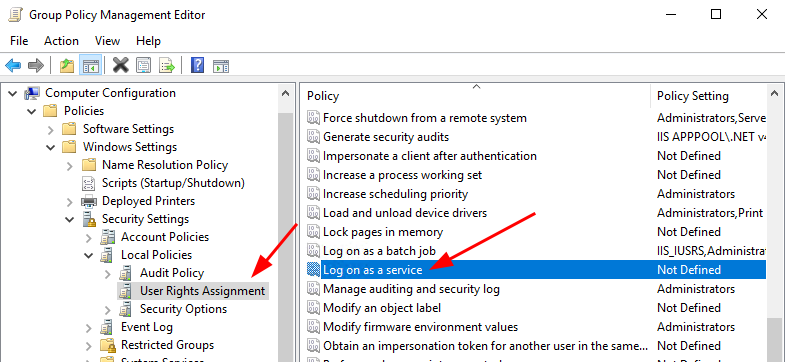
The “Log on as a service” permission is a policy setting that determines which service accounts can register a process as a service. Running a process under a service account circumvents the need for human intervention. On the computer that will be using the new sMSA account, we need to add the sMSA account to the “Log on as a service” policy under the “User Rights Assignment” policy group.
This policy can be configured in one of two places. If you need an sMSA on a Domain Controller, as I do, then you need to create a Group Policy Object(GPO). If you need the sMSA on any other type of computer, then you can configure the Local Security Policy. You could use a GPO for a non-Domain Controller computer and set the GPO scope to one computer. However, I will not show you that method here(it’s basically the same anyways; you can figure it out).
Configure “Log on as a service”
If you need to add the sMSA account to a Domain Controller, you will need to open Group Policy manager and edit the existing built-in policy named “Default Domain Controllers Policy“. Otherwise, at the computer you are adding the sMSA to, open the Local Security Policy editor using the command “secpol.msc“.
In the policy editor tool, navigate to the following location.
GPO Location: “Computer Configuration/Windows Settings/Security Settings/Local Policies/User Rights Assignment/Log on as a service“
SecPol Location: “Security Settings/Local Policies/User Rights Assignment/Log on as a service“
Right-click the “Log on as a service” entry and click properties.
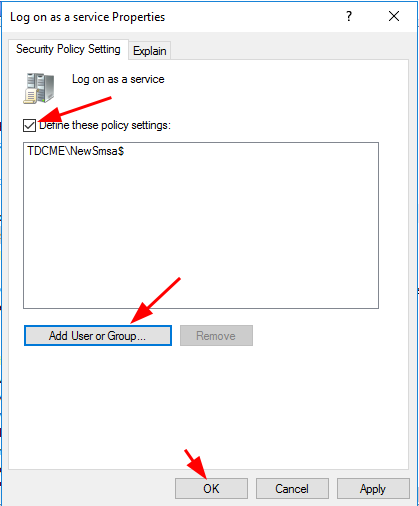
In the new popup window, click the box next to “Define these policy settings“, then click “Add User or Group…“. Add the new sMSA account and click “OK“
Go ahead and close out of GPO or SecPol editor to save the changes. If you want the changes to update right away, run “Invoke-GPUpdate“. You are all good now!
Schedule Task Event 101; Error Value: 2147943785
You will know if you did not do this step correctly once you try to run a scheduled task. If done incorrectly, in the Schedule Task manager, the task history will have Event ID 101, which contains the error value: 2147943785. This means your Managed Service Account is misssing the “Log on as a service” permission.
Creating a Schedule Task with an sMSA
The final step is creating the Scheduled Task with the new sMSA account. The Schedule Task GUI interface does not have a way of assigning an sMSA account as the Runas user for the task; that can only be done through PowerShell. So we need to create the basics of the scheduled task in PowerShell, and we can edit the other task details in the GUI later if required.
Run the following commands in an administrative PowerShell session on the computer using the sMSA.
# Get the DateTime of tomorrow at 9 AM.
$ScheduleRunTime = (Get-Date).AddDays(1).Date + "09:00:00"

# Set the Task to run Daily at 9 AM starting tomorrow.
$Trigger = New-ScheduledTaskTrigger -Daily -DaysInterval 1 -At $ScheduleRunTime

# Define that I want to launch PowerShell and run my scripts.
$Action = New-ScheduledTaskAction -Execute 'PowerShell.exe' -Argument 'C:\Scripts\MyScript.ps1'

# Run only if the server is online, but wake the system to run if needed.
$Settings = New-ScheduledTaskSettingsSet -RunOnlyIfNetworkAvailable -WakeToRun

# Run the task with the sMSA AD account. You must have the "-LogonType Password" flag set for this to work!
# Also, note in the UserID that I added a '$' to the end of the username; this is a MUST for you too!
$Principal = New-ScheduledTaskPrincipal -UserID 'DOMAIN\NewSmsa$' -LogonType Password -RunLevel Highest

# Use all the variables we set up and register the new Scheduled Task.
Register-ScheduledTask -TaskName "MyNewScheduledTask" -Action $Action -Trigger $Trigger -Settings $Settings -Principal $Principal
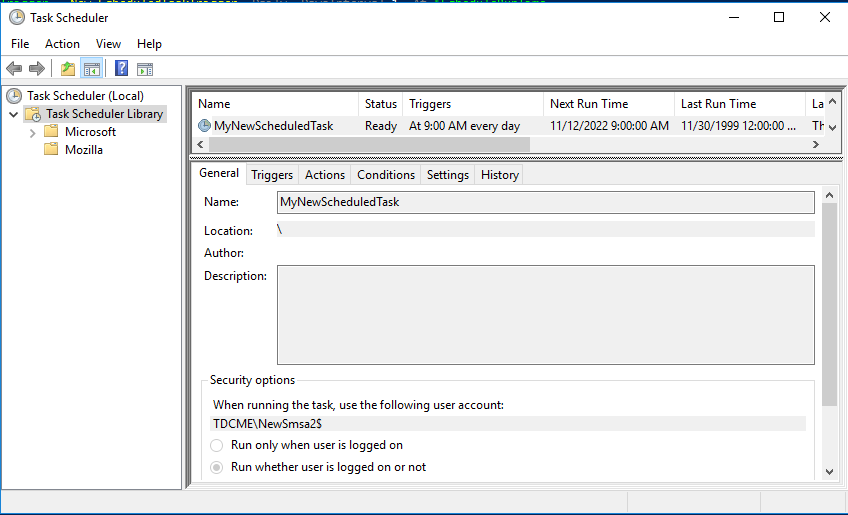
You can confirm and edit the newly created Schedule Task in the task manager. You can make changes in the Task Manager GUI without breaking the Runas sMSA settings.
That is it! We are all set!
Wrap-up – TLDR: Too Long Didn’t Read

There are three key steps to securely create a Windows Scheduled Task that can run consistently with the right permissions.
- Create a Standalone Managed Service Account(sMSA) in Active Directory.
- Create a Group Policy Object or Local Security Policy that gives the new sMSA account “Log on as a service” permissions
- With PowerShell, create the new Scheduled Task that is Runas the new sMSA account.
That is it. Did I miss anything? Let me know in the comments below. Last thought, Scheduled Tasks in Windows are way more complicated than it needs to be. In Linux, it is so clean, clear, and straightforward. Ugh… Windows…


